When you go to a restaurant for the first time, you don't know what to order until the menu arrives. When users use your application, they need a menu so they will know what to order also. Just like a restaurant's customers, your application's new users will not know what they can do. The menu gives them a guide. Once they become more familiar with the application, they will also learn various shortcut keys you supply on the menu bar.
Most Windows programs contain common menu commands. Visual Basic is one such program. Many of the Visual Basic pull-down menus contain the same commands as Microsoft Word and Microsoft Excel. You should follow this pattern as closely as you can. Group your file-related commands on the menu bar's File option so your users will feel right at home with your application. Your application will require some menu options that no other application uses, and your application certainly may not be as complete as VB's, but use as much overlap as you can so your users can adapt as quickly as possible to your application's interface.
The highlights of this hour include
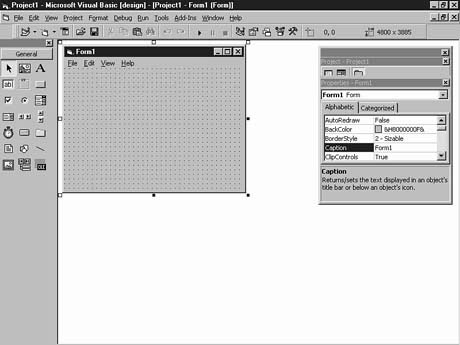
Before looking at menu creation, take a moment to familiarize yourself with Figure
17.1's menu components. The rest of this lesson discusses the various components
that make up most Windows menus. In working with Visual Basic, you've already seen
these menu components.
Figure
17.1. The menu components.
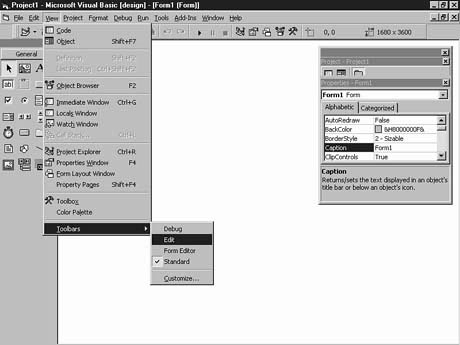
NOTE: Notice that Visual Basic displays toolbar icons next to menu options that appear on one of the toolbars. Most of Microsoft's newer products now show the toolbar icons on matching menu options. You'll more quickly learn which toolbar goes with which menu item because you'll more quickly associate toolbar button icons to their equivalent menu options. Unfortunately, you cannot add such icons to your own application menus because Visual Basic does not give you a way to add the icons.
Even Visual Basic programming gurus don't always know that a menu is another control object just like a command button or a text box. Once you add a menu bar to an application, the menu bar and its options are all controls that you can manage from the Properties window. Even though the menu items are regular controls with properties you can set, the programming gurus don't often know that because they use a better resource than the Properties window for creating their menus. Whereas the Properties window is great for setting normal toolbox control properties, the Menu Editor makes for a better menu-creation tool.
The Menu Editor lets you quickly and easily place menu bar items into your application by pushing command buttons and typing a few property values. The Menu Editor contains menu description tools that let you create the application's menu bar, menu commands, and shortcut access keys to all of your applications.
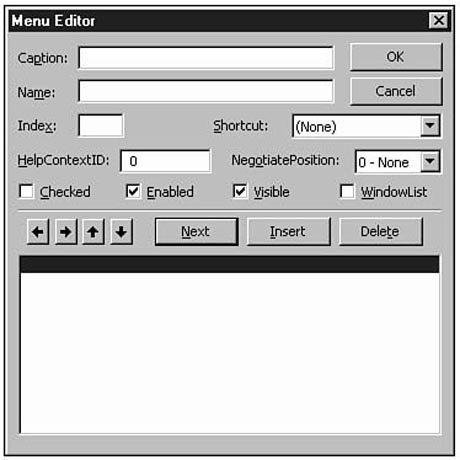
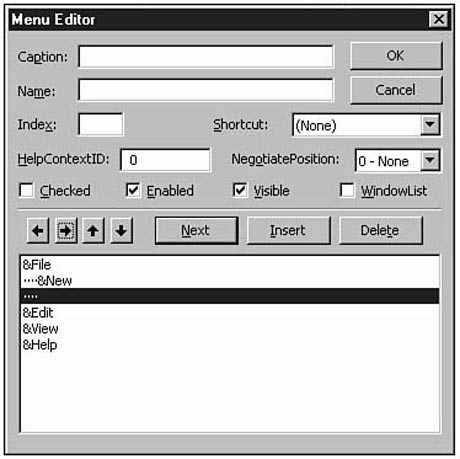
The Menu Editor is a dialog box that you access from the Form window by pressing
Ctrl+E or by selecting Tools | Menu Editor from Visual Basic's own menu bar. Figure
17.2 shows the Menu Editor dialog box.
Figure
17.2. Creating a menu with the Menu Editor.
The Menu Editor creates your menu, but you still need to write event procedures that tie menu command selections to actions taken by your application. When the user selects a menu command, Visual Basic generates an event, just as it generates an event when the user clicks a command button. The only event that menu items support is the Click() event. Therefore, whether the user selects a menu option with a mouse or with a keyboard, that selection triggers a Click() event.
NOTE: Learning to add menus to your programs involves a mastery of the Menu Editor, and you'll always re-open the Menu Editor if you want to modify an application's menu. After you use the Menu Editor to create the menu, the menu's event procedures work just like the other event procedures that you've been writing throughout this book.
As you'll see throughout the rest of this lesson, the Menu Editor lets you add to applications a menu bar, pull-down menu commands, separator bars (bars that help group menu options), submenus (menus that appear from other menu options), checked items, and shortcut access keystrokes. After you create the menu, you'll write event procedures for each menu option. When the user selects a menu command, that menu command's event procedure will automatically execute.
NOTE: Sometimes the options on the menu bar's pull-down list are called items or commands. This tutorial uses the more common term, option, throughout the text.
An application's menu bar is one of the easiest parts of the menu system to add. This section walks you through the steps necessary to add a menu bar. Subsequent sections show you how to add pull-down menu options to each of the menu bar commands.
The Menu Editor makes adding a menu bar to any application simple. Create a new project so you can practice creating a menu. The menu bar you create will contain the following options:
This tutorial could go into a lot of detail, explaining all the nuances of the Menu Editor. Luckily, you don't need all that preliminary detailed description. The Menu Editor is most easily mastered by jumping in and building a menu from scratch. You don't need a bunch of theory to use the Menu Editor.
Every option on a menu bar, as well as the menu options, submenus, and separator bars that appear when you display a pull-down menu, has properties just as the other controls do. The Menu Editor acts like a dialog box that helps you set menu property values. The Properties window is perfect for the other controls, but as you'll see, menus require a few extra kinds of property choices that the other controls don't need. That's why using the customized Menu Editor is simpler than modifying an application's menu through the Properties window.
Perform the following steps to add a menu bar to your new project:
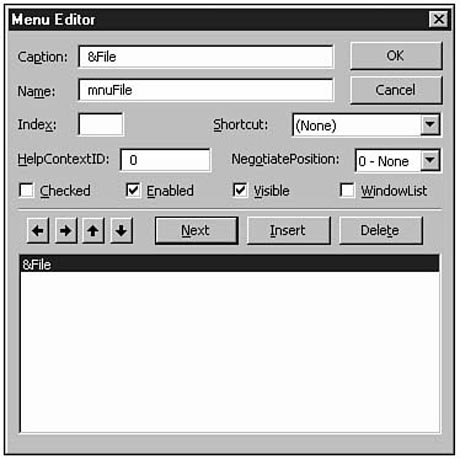
Figure 17.3. The menu bar now has a defined File option.
You should follow a standard naming convention when naming menu options.
The event procedures within any Visual Basic application reference menu options by their menu option names. Preface all menu items, both menu bar and pull-down menu items, with the mnu prefix so that you can easily distinguish menu commands from variables and from the other controls as you work within the application's code.
NOTE: Generally, Visual Basic programmers follow the standard of naming menu bar options with the prefix mnu followed by the name of the item. Therefore, the File option is named mnuFile, Edit is named mnuEdit, and so on.
As you add pull-down options to the menu bar items, preface each of those options with the mnu prefix as well as the name of the menu bar command, and then append the name of the pull-down menu's item. Therefore, the File | Exit item would be named mnuFileExit, View | Normal would be named mnuViewNormal, and so on. The names then clearly describe the menu items that they represent. If a submenu appears, append its item name to the parent's name (for example, mnuViewNormalFull).
Follow these steps to complete the creation of a menu bar:
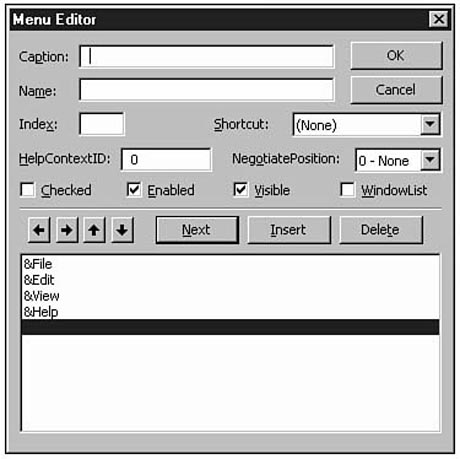
Figure
17.4. The menu bar is now complete, with
four options.
Close the Menu Editor by pressing Enter or clicking the OK command button. Immediately,
Visual Basic displays the new menu bar across the top of the application's Form window,
as shown in Figure 17.5. The menu bar is the result of your efforts with the Menu
Editor.
Obviously, the menu is incomplete. The menu bar exists, but no options pull down
from the menu bar. You're now ready to add the individual pull-down options to the
menu. The next section explains how to complete the File pull-down menu.
Figure
17.5. The Form window's new menu bar.
Each menu bar command opens a pull-down menu that consists of a series of options, separator bars, access keystrokes, and submenus. The Menu Editor's four arrow command buttons let you indent the pull-down menu commands from their matching menu bar commands to show which items go with which menu bar commands.
Now that you've added the menu bar, you can add the individual options to the pull-down menus. You didn't have to complete the menu bar before completing each pull-down menu. You could have added the File option to the menu bar and then completed the File option's pull-down menu before adding the View option to the menu bar. The order in which you add menu items doesn't matter at all. It is where you place them and how you indent them that determines the order in which the menu items appear.
The File pull-down menu will contain the following items:
After you add these submenu items, you can hook up the menu commands to Click() event procedures that you write, as explained in the next section.
Adding pull-down items requires that you follow the same steps you followed when you added the menu bar items in the previous section. The difference is that the Menu Editor options that the previous section ignored, such as the Shortcut option, become more important because you'll apply some of these options to the pull-down menu items. Table 17.1 explains the remaining Menu Editor properties.
Table 17.1. The Menu Editor's remaining properties.
| Property | Description |
| Checked | Indicates whether a menu item has a checkmark next to it. Generally, you'll add checkmarks to menu options that perform on or off actions, such as a View menu that contains a Highlighted command. The checkmark appears when you, at design time or through code, set the menu item's Checked property to True. The checkmark goes away (indicating that the item is no longer active or selected) when you set the Checked property to False. |
| HelpContextID | This is a code that matches a help file description if and when you add help files to your application. |
| Index | If you create a menu control array rather than name individual menu items separately, this Index property specifies the menu item's subscript within the control array. |
| Shortcut | This is a drop-down list of Ctrl+keystroke access keys that you can add to any pull-down menu item. |
| Window List | Specifies whether the menu item applies to an advanced application's MDI (multiple-document interface) document. The menus that you create for this book don't require the use of MDI features. |
Perhaps the most important command keys on the Menu Editor, when you add pull-down menu items, are the four arrow command buttons. The left and right arrow command buttons indicate which items go with which menu bar option. In other words, if four items in the lower window are indented to the right and appear directly beneath the File menu bar item, those four indented items will appear on File's pull-down menu. The left arrow removes an indentation level and the right arrow adds an indentation level. The up- and down-arrow keys move menu items up and down the list of menu items, rearranging the order if you need to do so.
The arrow keys make a lot of sense when you see them used. Follow these steps to create the File pull-down menu bar's submenu:
Figure 17.6. The File pull-down menu is gaining additional options.
Separator bars help you break individual pull-down menus into separate sections. Although several options appear on most Windows applications' File pull-down menus, these options don't all perform the same kind of tasks. Some options relate to files, some relate to printing, and the Exit command always appears on the File menu as well. The separator bars help distinguish groups of different items from each other on the pull-down menus.
All separator bars have the same Caption property, which is nothing more than a hyphen (-). You must give every separator bar a different name. Usually, the name of the separator bars on the File menu are mnuFileBar1, mnuFileBar2, and so on. Some programmers prefer to name the first separator bar Sep1, the second Sep2, and so on, no matter which menu the separator bar appears on.
You must add the separator bars on an indented menu level so that they indent properly beneath their pull-down menus. Follow these steps to add the single separator bar for this lesson's File pull-down menu:
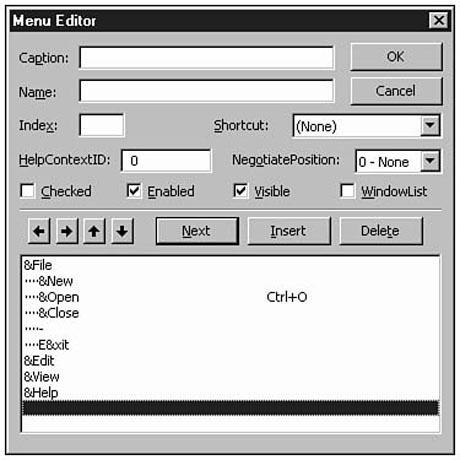
There's one more item to add: the Exit item. You know enough to add the Exit option
to the File menu. After adding Exit, your Menu Editor should look like the one shown
in Figure 17.7.
Figure
17.7. The File menu is now complete.
You don't need to complete all the menu bar options. You already know how to add routine options. If you need to add additional menu elements, however, such as a submenu or a checked item, the mechanics of those additions are about as simple as the items that you added in the previous sections.
To practice adding a checked object, add one checked item to the View pull-down menu bar item. Add an indented option that uses Highlighted for the Caption item and mnuViewHighlighted for the Name. Click the Checked check box. The View | Highlighted option will initially be checked when the user displays the View pull-down menu. Your code can check and uncheck the item by changing the mnuViewHighlighted object's Checked property to True and False.
If you want to add a submenu from a pull-down menu item, add an additional level of indentation. For example, to add a two-option submenu off the File | Open option that gave the user an additional choice of Binary or Text (binary and text are two possible kinds of files), insert a place for the first item right beneath Open and click the right-arrow command button to add a second ellipsis. Type &Binary for the Caption property and mnuFileOpenBinary for the Name property. Insert an additional item beneath that, indented at the same level, and type &Text for the Caption property and mnuFileOpenText for the Name property.
NOTE: Your menu has a slight bug now! Go back to the &Open menu option and set the shortcut keystroke back to None. You cannot add a shortcut keystroke to a submenu's parent option.
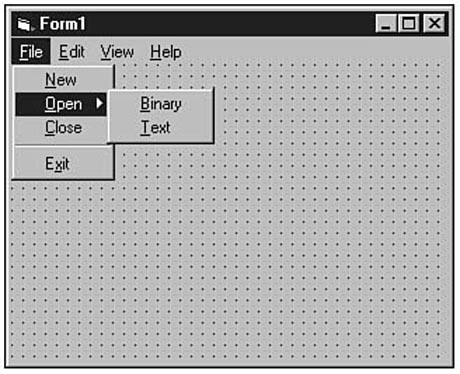
Now that you've completed the menu (as far as we're taking it here), click the
OK command button. When the Menu Editor disappears, you'll see the application's
Form window with the menu bar across the top of the screen. Open the File menu and
then select Open to see the submenu like the one shown in Figure 17.8. Notice the
right arrow next to Open, which indicates that an additional submenu will appear
for that option.
Figure
17.8. The File menu is now complete.
Once you've built your menu, you need to tie each menu command to your application. To respond to menu selections, you need to write Click() event procedures that you want Visual Basic to execute when the user selects a menu command.
Visual Basic generates a Click event when the user selects a menu command. The name of the menu command, combined with Click(), provides the name of the event procedure. Therefore, the File | Exit menu item named mnuFileExit will generate the execution of the event procedure named mnuFileExit_Click().
Adding the mnuFileExit_Click() event procedure requires only that you select that menu command during the program's development. At the Form window, click the File menu bar command. Visual Basic displays the Form window's File pull-down menu. Even though you're not running the program but are working on the program from the Form window, the File menu shows you what happens when the user selects File at runtime.
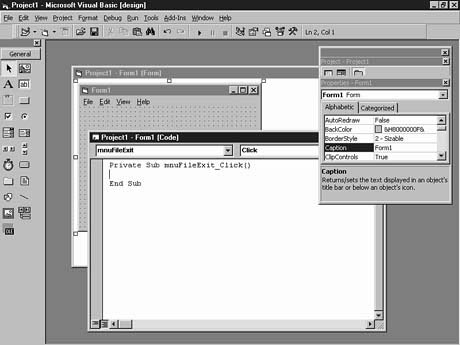
Click the Exit item on the File pull-down menu. As soon as you click Exit, Visual
Basic opens the Code window to a new event procedure named mnuFileExit_Click(),
as shown in Figure 17.9.
Figure
17.9. The menu option's Click()
event procedure.
This event procedure is simple to code. When the user selects File | Exit, you want the application to terminate. Therefore, insert an Unload Me and an End statement to the body of the mnuFileExit_Click() procedure and close the procedure by double-clicking its control button. As you can see, adding event procedures requires little more than clicking the menu item and adding the body of the procedure that appears.
Although the application is far from complete, you can run the application to see how the menu looks and to test the File | Exit option.
After building your menu, you must tie code to the various menu items by writing Click() event procedures that will execute when the user runs the application and selects from the menu. If any menu command duplicates the functionality of other controls, such as command buttons, don't copy the command button's code into the body of the menu event procedure. Instead, simply execute that command button's event procedure from the menu item's event procedure.
NOTE: The Menu Editor creates a working menu shell. As you've seen, the Menu Editor will not do more than produce a working menu that responds the way other Windows menus respond. You must write all the code behind all the menu options. If you want a checkmark to disappear from a checked menu item (such as this application's View | Highlighted option), your code will have to hide the checkmark. The mark will not disappear on its own when the user selects the option.
Here's a tip that you should file away for the day when you want to copy a menu from one form to another project's form file. Although several methods exist, one way that you can accomplish this copy is to perform these steps:
Begin VB.Menu mnuFile

   Caption         =   "&File"

   Begin VB.Menu mnuFileNew

      Caption         =   "&New"

   End

   Begin VB.Menu mnuFileOpen

      Caption         =   "&Open"

      Begin VB.Menu mnuFileOpenBinary

         Caption         =   "&Binary"

      End

      Begin VB.Menu mnuFileOpenText

         Caption         =   "&Text"

      End

   End

   Begin VB.Menu mnuFileClose

      Caption         =   "&Close"

   End

   Begin VB.Menu mnuFileBar1

      Caption         =   "-"

   End

   Begin VB.Menu mnuFileExit

      Caption         =   "E&xit"

   End

End

Begin VB.Menu mnuEdit

   Caption         =   "&Edit"

End

Begin VB.Menu mnuView

   Caption         =   "&View"

   Begin VB.Menu mnuViewHighlighted

      Caption         =   "Highlighted"

      Checked         =   -1  `True

   End

End

Begin VB.Menu mnuHelp

   Caption         =   "&Help"

End
Adding menus to your applications requires only that you master the Menu Editor. Menus are nothing more than advanced controls with property values that you set using the Menu Editor. Most menu items require that you specify a Caption and Name property as well as indent the item properly under its menu bar command. Optionally, a menu item might contain a shortcut access keystroke or a checkmark next to the item.
The next hour will be really fun--you'll learn how to add colorful graphic images to your applications.
The quiz questions and exercises are provided for your further understanding. See Appendix C, "Answers," for answers.
![]()
![]()
![]()
![]()
![]()